

What Is the ImageNet Dataset?
The ImageNet dataset is a large-scale, annotated database of images designed for use in computer vision research. Developed by a team of researchers from Stanford University, Princeton University, and other institutions, it has been used to advance the field of computer vision in general, and more specifically, object recognition and image classification.
The dataset contains millions of images covering thousands of object categories, labeled to provide accurate training data for algorithms.
ImageNet has become a benchmark for evaluating the performance of algorithms in accurately identifying and categorizing objects within images. Its structured format and comprehensive nature have made it a popular dataset for developing and testing image recognition algorithms.
However, as computer vision algorithms become more powerful, the utility of ImageNet has diminished in recent years. While it is still useful, state of the art algorithms might need larger and more complex datasets for effective training.

Source: Stanford
This is part of a series of articles about machine learning datasets
Key Features of the ImageNet Dataset
ImageNet offers the following important features:
Diverse Categories
With over 20,000 categories, ImageNet covers a range of objects, scenes, and abstract concepts. This diversity ensures that algorithms trained on the ImageNet dataset can recognize a broad spectrum of objects in real-world settings.
WordNet Hierarchy
The ImageNet dataset utilizes the WordNet hierarchy to organize its categories. WordNet is a lexical database of English that groups words into sets of cognitive synonyms, providing short descriptions or “glosses.” Each category is linked to a WordNet synset, enabling nuanced and accurate classification tasks, helping algorithms differentiate between closely related concepts.
Extensive Collection
ImageNet contains over 14 million hand-annotated images distributed among its categories. This massive volume of data is useful for training deep learning models. The dataset’s size ensures models are exposed to a variety of lighting conditions, perspectives, and backgrounds, enhancing their ability to generalize from the training data to new, unseen images.
ImageNet Applications and Use Cases
The ImageNet dataset is useful for training the following types of projects.
Image Classification
Algorithms are trained to accurately assign a label to an image from a predefined set of categories. The dataset enables machines to recognize and understand content within images. For example, an algorithm trained on the ImageNet dataset could distinguish between images of cats and dogs, or more broadly, categorize photos as portraying natural scenes or urban environments.
Object Detection and Instance Segmentation
Object detection involves locating and identifying multiple objects within a single image. Instance segmentation goes a step further, delineating the exact boundaries of each object. Training algorithms on ImageNet prepares them to tackle complex scenes, identifying and segmenting various objects regardless of their size or overlap.
Self-Supervised Image Classification
Algorithms can be trained to generate their own labels from the unlabelled data, learning to understand and categorize images without explicit human annotation. Training with ImageNet helps refine these self-learning processes, reducing the need for hand-labeled datasets while maintaining high levels of accuracy. It helps make AI models more scalable and cost-effective.
What Is the ImageNet Large Scale Visual Recognition Challenge (ILSVRC)?
The ImageNet Large Scale Visual Recognition Challenge (ILSVRC) is an annual competition where research teams test their algorithms against a subset of the ImageNet dataset. Launched in 2010, with the last public challenge in 2017, it aimed to advance computer vision technologies by setting various tasks, such as image classification, object detection, and object localization.
By providing a standardized benchmark, ILSVRC enables a direct comparison of algorithms, fostering innovation. Several of the algorithms that won the ILSVRC became significant milestones in computer vision research—these include AlexNet, Google Inception, VGG, and ResNet.
Limitations of the ImageNet Dataset
Over the years there have been several important criticisms of the ImageNet dataset in the research community, including:
- MIT researchers identified significant “systematic annotation issues” in the dataset, highlighting a misalignment between the dataset and actual real-world observations when used for benchmarking purposes. ImageNet was found to have accuracy issues mainly related to images containing multiple objects (Tsipras, et al., 2020).
- A paper evaluating the relevance of ImageNet for modern computer vision algorithms concluded that its usefulness may be nearing an end, and proposed a new set of labels that could increase the dataset’s utility (Beyer, at al., 2020).
- In 2022, the ImageNet project team blurred faces in their dataset to protect individual’s privacy, which reduces the usefulness of the dataset for some purposes (Yang, et al., 2022).
Quick Tutorial: Downloading and Using the ImageNet Dataset with PyTorch
In this tutorial, we’ll cover how to acquire and set up the ImageNet dataset for use in machine learning projects via Kaggle.
Setting Up the Kaggle CLI
First, make sure you have a Kaggle account. Install the Kaggle Command Line Interface (CLI) using the Python package manager pip:
pip install kaggleConfiguring Your API Credentials
Before using the Kaggle API, you need to generate an API token through your Kaggle account. This is done by navigating to the Account section of your profile and selecting Create API Token. The resulting download of kaggle.json contains your API credentials.
This file must be placed in a specific directory (~/.kaggle/kaggle.json on Unix-like systems or C:\Users\<Windows-username>\.kaggle\kaggle.json on Windows). Optionally, you can modify this default location by setting the KAGGLE_CONFIG_DIR environment variable to a new path with the kaggle.json.
Downloading the Dataset
Downloading the dataset is straightforward but may require patience due to its substantial size of 168 GB:
Note: Ensure your hard-disk has at least 330GB free before downloading and unzipping the file.
kaggle competitions download -c
imagenet-object-localization-challenge
Following the download, the dataset needs to be extracted to a desired directory. This step can be achieved using standard file extraction commands, depending on your operating system.
Preparing Additional Resources
Before utilizing the dataset, two additional helper files are necessary for facilitating certain operations. These files can be easily downloaded into the directory containing the ILSVRC folder using wget on Unix Systems:
cd <YOUR_FOLDER>
wget https://raw.githubusercontent.com/raghakot/keras-vis/master/resources/imagenet_class_index.json
wget https://gist.githubusercontent.com/paulgavrikov/3af1efe6f3dff63f47d48b91bb1bca6b/raw/00bad6903b5e4f84c7796b982b72e2e617e5fde1/ILSVRC2012_val_labels.json
Implementing a Dataset Class for PyTorch
Create a Dataset class compatible with PyTorch. This class facilitates the loading of images and their respective labels into the model for training or validation purposes.
The process involves parsing the downloaded class index and label files to map the synset IDs to their corresponding class IDs, as follows:
# Import required libraries and modules
import os
from torch.utils.data import Dataset
from PIL import Image
import json

# Define the custom dataset class for the ImageNet dataset
class ImageNetKaggle(Dataset):
    def __init__(self, root, split, transform=None):
        self.samples = []  # List to store paths to images
        self.targets = []  # List to store corresponding class labels for images
        self.transform = transform  # Transformation function to apply to images (e.g., normalization)
        self.syn_to_class = {}  # Dictionary to map synset IDs to class IDs

        # Load class index file and create a mapping from synset IDs to class IDs
        with open(os.path.join(root, "imagenet_class_index.json"), "rb") as f:
            json_file = json.load(f)
            for class_id, v in json_file.items():
                self.syn_to_class[v[0]] = int(class_id)

        # Load validation labels file and create a mapping from image file names to synset IDs
        with open(os.path.join(root, "ILSVRC2012_val_labels.json"), "rb") as f:
            self.val_to_syn = json.load(f)

        # Construct the path to the directory containing the images for the specified split (train/val)
        samples_dir = os.path.join(root, "ILSVRC/Data/CLS-LOC", split)

        # Iterate over the directory to populate the samples and targets lists with image paths and class labels
        for entry in os.listdir(samples_dir):
            if split == "train":
                # For training images, use the directory name as the synset ID
                syn_id = entry
                target = self.syn_to_class[syn_id]  # Map synset ID to class ID
                syn_folder = os.path.join(samples_dir, syn_id)
                for sample in os.listdir(syn_folder):
                    sample_path = os.path.join(syn_folder, sample)
                    self.samples.append(sample_path)
                    self.targets.append(target)
            elif split == "val":
                # For validation images, use the mapping from image file name to synset ID
                syn_id = self.val_to_syn[entry]
                target = self.syn_to_class[syn_id]  # Map synset ID to class ID
                sample_path = os.path.join(samples_dir, entry)
                self.samples.append(sample_path)
                self.targets.append(target)

    # Return the total number of samples in the dataset
    def __len__(self):
        return len(self.samples)

    # Retrieve an image and its corresponding label by index, applying any transformations if specified
    def __getitem__(self, idx):
        x = Image.open(self.samples[idx]).convert("RGB")  # Open image and convert to RGB
        if self.transform:
            x = self.transform(x)  # Apply transformations to the image
        return x, self.targets[idx]  # Return the transformed image and its label
Validating the Setup
Note: It is highly recommended to carry out this step on a machine with a GPU.
To confirm the successful setup of the dataset and its compatibility with PyTorch, run a validation epoch using a pre-trained model such as ResNet-50. Create a DataLoader to iterate over the dataset with the appropriate transformations and calculate the model’s accuracy on the validation set.
import torch
from torchvision import models, transforms
from torch.utils.data import DataLoader
import torch.nn.functional as F

# Assuming the ImageNetKaggle class is defined as above

# Define transformations for the validation data
transform = transforms.Compose([
    transforms.Resize(256),
    transforms.CenterCrop(224),
    transforms.ToTensor(),
    transforms.Normalize(mean=[0.485, 0.456, 0.406], std=[0.229, 0.224, 0.225]),
])

# Initialize the ImageNetKaggle dataset for the validation split
imagenet_val_dataset = ImageNetKaggle(root='path/to/your/dataset', split='val', transform=transform)

# Create a DataLoader for the validation dataset
val_loader = DataLoader(imagenet_val_dataset, batch_size=64, shuffle=False, num_workers=4)

# Load a pre-trained ResNet-50 model
model = models.resnet50(pretrained=True)
model.eval()  # Set the model to evaluation mode

# Move model to the appropriate device (GPU if available)
device = torch.device("cuda" if torch.cuda.is_available() else "cpu")
model.to(device)

# Function to calculate accuracy
def calculate_accuracy(output, target):
    """Calculate accuracy given output and target"""
    with torch.no_grad():
        pred = torch.argmax(output, dim=1)
        assert pred.shape[0] == len(target)
        correct = 0
        correct += torch.sum(pred == target).item()
    return correct / len(target)

# Validate the model on the validation dataset
correct = 0
total = 0
with torch.no_grad():
    for images, labels in val_loader:
        images, labels = images.to(device), labels.to(device)
        outputs = model(images)
        correct += calculate_accuracy(outputs, labels) * images.size(0)
        total += images.size(0)

# Print out the accuracy
accuracy = correct / total
print(f'Accuracy of the network on the validation images: {accuracy * 100:.2f}%')
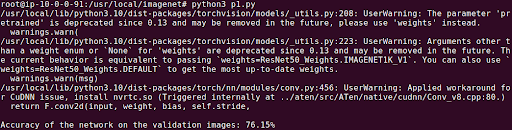
The output should look something like this:
Testing and Evaluating Computer Vision Models with Kolena
We built Kolena to make robust and systematic ML testing easy and accessible for all organizations. With Kolena, machine learning engineers and data scientists can uncover hidden machine learning model behaviors, easily identify gaps in the test data coverage, and truly learn where and why a model is underperforming, all in minutes not weeks. Kolena’s AI / ML model testing and validation solution helps developers build safe, reliable, and fair systems by allowing companies to instantly stitch together razor-sharp test cases from their data sets, enabling them to scrutinize AI/ML models in the precise scenarios those models will be unleashed upon the real world. Kolena platform transforms the current nature of AI development from experimental into an engineering discipline that can be trusted and automated.
Among its many capabilities, Kolena also helps with feature importance evaluation, and allows auto-tagging features. It can also display the distribution of various features in your datasets.
Reach out to us to learn how the Kolena platform can help build a culture of AI quality for your team.
